Contents
- Index
Getting Started
Initial Set Up
When you first install the program, all of the databases (files) are empty. You will need to define entries in a number of files before you will be able to print your first bill. After a brief explanation of the main screen, you will find a section on what to do first.
Main Screen Layout
The main screen is not only the gateway to all of the functions of Lading Manager Lite, but it also acts as the "About" screen. The version you are running is clearly displayed and you can check for updates to the software from here. The layout is:
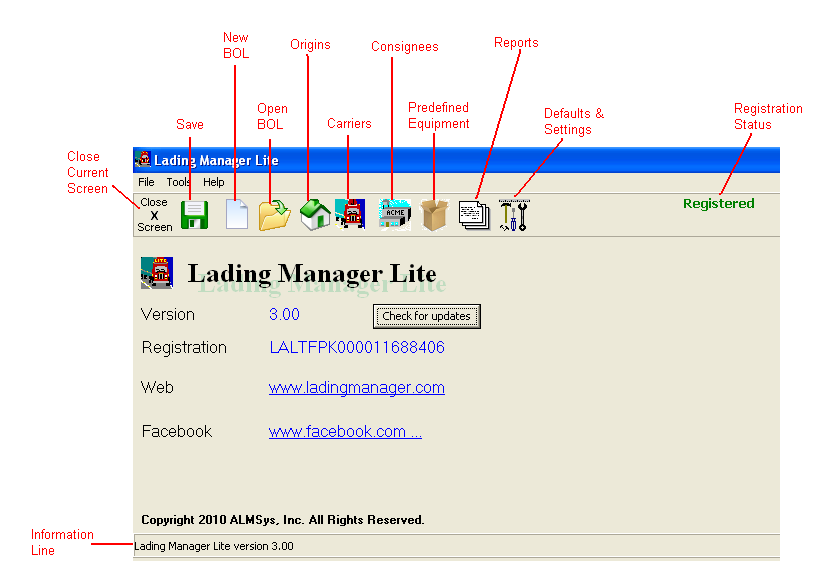
Buttons
 Close Screen. This will close the current screen. If there is only the main screen open, the program itself will close.
 Save. This will only display when there are changes to be saved. Press this to save the changes.
 New BOL. This will start a new bill of lading.
 Open BOL. This will display a list of existing bills. From this list, you may select a bill to work on, delete a bill (or bills), or copy an existing bill to a new bill.
 Origins Maintenance. This will take you to Origins Maintenance. Origins are used to show where the shipment is from.
 Carriers Maintenance. This will take you to Carriers Maintenance. Carriers represent the company or person(s) hauling the load.
 Consignees Maintenance. This will take you to Consignees Maintenance. Consigness are used to show where the shipment is going.
 Predefined Equipment Maintenance. This will take you to Predefined Equipment Maintenance. Equipment, or what you normally ship, may be predefined for quick selection. Use this if you tend to send the same items repeatedly.
 Reports. This will take you to the reports available in the program.
 Defaults and Settings. This will take you to the defaults and setting maintenance screen.
Menu Selections
File - New Bill of Lading. This will start a new bill of lading.
File - Save As New Bill. For the currently opened bill, this will copy the bill to a new bill.
File - Renumber Bill. For the currently opened bill, this will renumber the bill to a new number of your choice.
File - Backup / Restore Files. This will back up or restore your files.
File - Import Fast-PO Data File. This will import a data file from Fast-PO, a purchase order system also written by ALMSys, Inc. See www.fast-po.com for more details.
Tools - Special Instructions Maintenance. This will take you to Special Instructions Maintenance.
Tools - Shipper Maintenance. This will take you to Shipper (Company) Maintenance.
What to do First
The first thing that you need to decide is the numbering scheme for your bills. Each bill that you create will be assigned a unique number. This number is not only printed on the bill, but is used to track the bill in the software also.
To define what this number will look like, please go to Defaults Maintenance by clicking the button. Here is where you will find the Lading Number Settings, as well as other settings. Please click here to continue.
Where to go Next
After establishing the defaults, shipper, and "Home" origin, you may go straight to entering your first bill. Or, you can go through each of the maintenance setup screens as indicated in the maintenance screens' "Where to go Next" section.