Contents
- Index
Bill of Lading Screen
The bill of lading entry screen is laid out in roughly the same layout as the printed bill. This makes entry much easier and more familiar. This screen is where you will create and print your bills of lading. It is a busy screen with many options and functions. You will find, however, that it is very easy to use after a little practice.
There are a few ways to start a new bill.
You may start on from scratch by pressing the  button.
You may copy an existing bill to a new bill by first opening the desired bill and then selecting File - Save As New Bill from the pulldown menu.
You may copy an existing bill from the Bill Manager.
If your customer sends you a Fast-PO data file, you may add a new bill with data from that file. Select File - Import Fast-PO Data File from the pull-down menu. A new bill will be added with the normal new bill defaults. A new consignee will be added if necessary and assigned to the bill using data from the import file. Non-blank detail lines from the data file will added, but no quantites or weight will be provided. (Although there are item quantities in the data file, the quantities on the bill must be shipping unit quantities, and not item quantities.)
button.
You may copy an existing bill to a new bill by first opening the desired bill and then selecting File - Save As New Bill from the pulldown menu.
You may copy an existing bill from the Bill Manager.
If your customer sends you a Fast-PO data file, you may add a new bill with data from that file. Select File - Import Fast-PO Data File from the pull-down menu. A new bill will be added with the normal new bill defaults. A new consignee will be added if necessary and assigned to the bill using data from the import file. Non-blank detail lines from the data file will added, but no quantites or weight will be provided. (Although there are item quantities in the data file, the quantities on the bill must be shipping unit quantities, and not item quantities.)
Each section on the screen will be covered in detail. It is very important that you understand how data is input on this screen. The more you know, the faster you will be able to create your bills.
As you make changes, the save button  will come on. Please remember to save your changes.
Top of Screen
At the top of the bill screen, there are a couple of fields:
Shipped. This is to be checked when the load has been shipped.
Date. The date of the bill. You may type the date in the box (mmddyyyy format), or select it from the drop-down calendar.
Logo Section
This section is used to control the logo on the bill. The bill of lading will display a one-inch by one-inch bitmap (BMP) in the upper, left-hand corner of the bill. (All logo files MUST be bitmap files.)
Logos are stored in a folder with the Lading Manager Lite data. The location of this folder will vary, based on the operating system of your PC. Here is where to look:
Vista/7: C:\ProgramData\ALMSysInc\LadingLite\Logos
NT/2000/XP: C:\Documents and Settings\All Users\Application Data\ALMSysInc\LadingLite\Logos
95/98/ME: C:\Windows\Application Data\ALMSysInc\LadingLite\Logos
Under the "LadingLite" folder, a "Logos" folder exists that contains a "blanklogo.bmp" file. By default, all bills will print with this blank logo. DO NOT DELETE OR ALTER THIS FILE.
The first logo file that you need to create is a default logo that will be used most often. Create your main logo and save it into the "Logos" folder and name it, "defaultlogo.bmp". If you are not a third party shipper, or if you will use the same logo for all bills, you are done.
Lading Manager Lite is set up to allow you to create a logo for each bill or for each Origin from which you ship. Creating a different logo for a specific shipper is easy to do. Simply create the bitmap file and save it as the Origin's number (with a .bmp extension). For example, if the Origin Number for the shipper is "apples," then you would create an "apples.bmp" in the "Logos" folder.
(Note: Your logo file does not need to be shrunk down to a one-inch size; the program will do this for you. However, your logo needs to be square so that it will resize appropriately. Color logos are OK.)
Here is the process which Lading Manager Lite uses to determine which logo file to use for new bills:
1. Use the Origin Number.bmp file if it exists.
2. Use the "defaultlogo.bmp" file if it exists.
3. Use the "blanklogo.bmp" file if it exists.
4. Print a square if none of the above exist.
The layout of the logo area on this screen is:

The buttons in the section work as follows:
 : Open a logo file. The file must already exist in the Logos folder.
 : Forces the program to use blanklogo.bmp for this bill.
 : Forces the program to use the default logo, based on the criteria list above for new bills.
Carrier Section
This section is used to control the carrier. The layout on the screen looks like this:
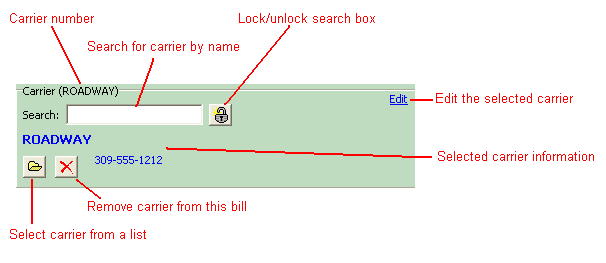
The search box is geared to look up the matching carrier name as you type it. If a match is not found, a message will pop up stating that the carrier does not exist and will give you the opportunity to add the new carrier. If you select that you wish to add it, you will be taken to Carriers Maintenance with your new carrier added .... all you need to do is to complete the name and address. You may also want to alter the carrier number from "new" to something that makes better sense. When you exit Carriers Maintenance, your information will be filled in for you.
You may also use the button to select a carrier from a list. You may display the list in either name or number order. Control the order by the "Search By" at the bottom of the window. You may also add a new carrier from the list display.
Once you have the carrier selected, you may want to lock the carrier against search field changes. Click the lock button to protect yourself from inadvertant changes. When the field is locked, it will not allow entry and will be gray in color.
Use the "Special Service" (not shown in sample above) to indicate at the top of the bill that you require one of the special services listed. You may set up your carriers to default to a specific service.
Consignee Section
This section is used to control the consignee. The layout on the screen looks like this:
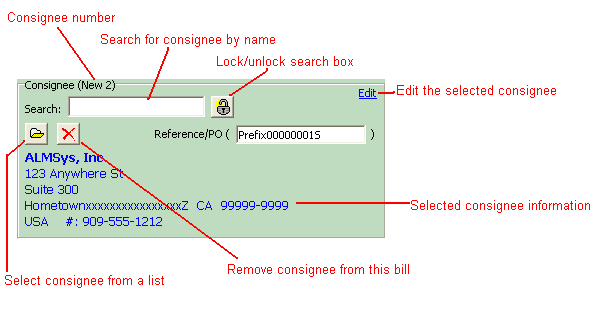
The search box is geared to look up the matching consignee name as you type it. If a match is not found, a message will pop up stating that the consignee does not exist and will give you the opportunity to add the new consignee. If you select that you wish to add it, you will be taken to Consignees Maintenance with your new consignee added .... all you need to do is to complete the name and address. You may also want to alter the consignee number from "new" to something that makes better sense. When you exit Consignees Maintenance, your information will be filled in for you.
You may also use the button to select a consignee from a list. You may display the list in either name or number order. Control the order by the "Search By" at the bottom of the window. You may also add a new consignee from the list display.
Once you have the consignee selected, you may want to lock the consignee against search field changes. Click the lock button to protect yourself from inadvertant changes. When the field is locked, it will not allow entry and will be gray in color.
Origin Section
This section is used to control the origin. The layout on the screen looks like this:
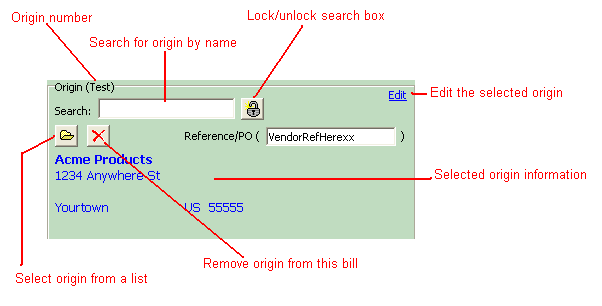
The search box is geared to look up the matching origin name as you type it. If a match is not found, a message will pop up stating that the origin does not exist and will give you the opportunity to add the new origin. If you select that you wish to add it, you will be taken to Origins Maintenance with your new origin added .... all you need to do is to complete the name and address. You may also want to alter the origin number from "new" to something that makes better sense. When you exit Origins Maintenance, your information will be filled in for you.
You may also use the button to select a origin from a list. You may display the list in either name or number order. Control the order by the "Search By" at the bottom of the window. You may also add a new origin from the list display.
Once you have the origin selected, you may want to lock the origin against search field changes. Click the lock button to protect yourself from inadvertant changes. When the field is locked, it will not allow entry and will be gray in color.
Getting Addresses from a Rig Expense Tracker Open Load
Rig Expense Tracker is another software product written by the same author of Lading Manager Lite. Its purpose is to track income and expenses for owner operators, leased operators, and company drivers. If you have this product installed, then Lading Manager Lite will display a button to the right of the Carrier Section and under the Action Panel. This button will copy the following information from Rig Expense Tracker:
1. Carrier information will come from the "Tools - Company" information.
2. Consignee information will come from the Destination data.
3. Origin information will come from the Origin data.
4. Bill To information will come from the Bill To data.
Lading Manager Lite will look in the files to see if a name and address already exists for the data being pulled. If it cannot find a match, a new record will be added to Lading Manager with the data from Rig Expense Tracker. A match is determined by name, address, city, state (or province), postal code, country, and phone number. New entries will be added using a "RET" prefix on the number.
For more information on Rig Expense Tracker, please go to www.rigexpensetracker.com.
Vehicle & Delivery Section
The top of this selects either "Vehicle Number" or "Pick-Up Date & Time" as the label for the box under the Consignee name and address. Fill in the field after this with data that you wish to print in this box.
The bottom of this selects either "Route" or "Delivery Date & Time" as the label for the box under the "Vehicle Number" box. Fill in the field after this with data that you wish to print in this box.
Deliver to Section
This works just like the Consignee Section.
Bill Details Section
This section is the area in which you specify what is being shipped. On a new bill, one blank line is added for you. Begin your bill on this line. Each column represents a column that will print in the detail area of the bill of lading. Total weight, total units and total charges will automatically be tallied. The bill details section looks like this:
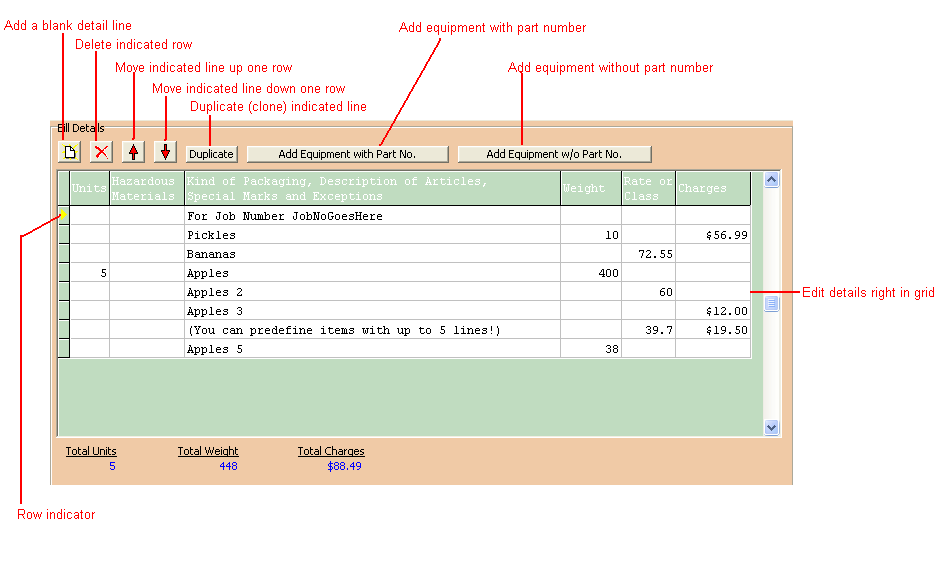
As you enter data into these fields, always tab forward after typing your data. (This takes the field out of "edit mode" and the program can then recognize that you have made a change.)
There are three ways to add a new detail line: 1) By pressing the Add button  at the top of the Bill Details area, or 2) by pressing one of the two Add Equipment... buttons at the top of the Bill Details area, or 3) by pressing the Duplicate button.
Do not worry about running out of detail lines for your bill of lading, as each bill is allowed over 32,000 lines!
Add Button
The add button will simply add a blank line at the bottom.
Add Equipment With Part Number
This will display the list of equipment that has been entered. Select the item by double clicking on it in the list presented. As a result, a line will be added in the format "Item #xxxxx dddddddddddd", where "xxxxx" is the part number and "dddddddddddd" is the part description.
If the resulting line is longer than will fit on one line, it will automatically be split into two lines where line one is the part number and line two is the part description.
Default information stored with the equipment (such as weight) will be entered as well.
All non-blank part description lines will be added to the bill.
Add Equipment w/o Part Number
This will display the list of equipment that has been entered. Select the item by double clicking on it in the list presented. As a result, a line will be added in the format "dddddddddddd", where "dddddddddddd" is the part description.
Default information stored with the equipment (such as weight) will be entered as well.
All non-blank part description lines will be added to the bill.
Duplicate Button
This will duplicate the current indicated detail line and add it as the last line of detail data.
Arrow Up and Down Buttons
These buttons will allow you to move existing detail lines up or down, one row at a time.
Special Instructions Section
Special instructions for this bill will be added from the consignee when the consignee has been added to the bill. If there are already special instructions present on the bill when you select the consignee, the consignee's special instructions will overwrite what is on the bill. (In other words, select the consignee before modifying the special instructions.) However, if the special instructions are locked, no changes will be made to the special instructions field when the consignee is changed.
Special instructions may be added to the bill via the Look Up button. Simply select special instruction on the screen and close the screen.
Use the button to erase the special instructions from this bill.
If you provide special instructions, it will reduce the number of details lines that can fit on one page of the bill.
Bill To / COD Shipment Section
Check the Third Party box if this is a third party bill. Third party bills do not print "C.O.D." information but rather "Ship-To" information. This information printed in the "C.O.D." or "Ship-To" area is normally taken from Company (Shipper) Maintenance. In the event that you would like to have the Consignee's name and address filled into this area, check the Remit To: Consignee box. You can also select a completely different "Remit/Bill To" name and address from the Origins file by filling in the "Other Origin" field.
The name and address for the "Other Origin" is provided from the list of consignees and the controls work just like the Consignee Section.
COD Section
If you need to ship C.O.D., then you must enable the C.O.D. fields by clicking the Enabled box. (If using the tab key between fields, press the space bar to toggle the check box.)
You will notice that the C.O.D. Fee fields have been filled in for you from the data provided for the carrier and consignee. You may change this if needed.
Freight Charges Section
The freight charges field has been filled in for you from the data provided for the consignee. You may change this if needed. The amount of the freight charges does not print on the bill, but rather used in the closed bills reports.
Delcaration Section
These 2 fields are printed in the Declaration section of the bill.
Signature of Consignor Section
Select "Shipper" if you wish to have the Shipper's name to fill into the "Signature of Consignor" area.
Emergency Section
This is used to store the default emergency contact phone number for the bill. It will print under the shipper's signature.
Other Forms Section
This is used as a gateway to additional forms associated with this bill.
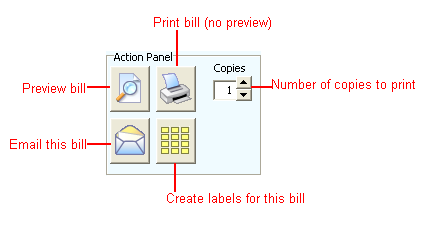
Action Panel
Located at the top of the screen, the action panel controls viewing the bill, printing the bill, emailing the bill, and creating labels for the bill. Its layout is:
The printed bill
Twelve detail lines will fit on one page of the bill, unless you have special instructions, which will result in nine detail lines. If you specified more than that, multiple pages will be created. On each of the multiple pages, the top and bottom portions will be repeated. The page number is printed in the upper, right-hand corner of the bill. The viewer will stipulate how many pages there are for the bill.
The last line of the detail area will contain a tally of the number of units and total weight.
If you want to print multiple copies of the bill, then the viewer/printer will do that for you. You can even name your copies, such as, "Copy 1: Original, Copy 2: Carrier" etc. See the Defaults screen for more details on how to do that. The bill of lading generator will create all of your pages and copies for you. Do NOT change the number of copies on the bill of lading print window unless you want multiple printouts of all of those copies.
E-mailing a Bill
Press the  button to send the bill of lading to the origin, carrier, consignee or all. Before you are able to send emails, you must first:
Set up your e-mail information on the E-mail Defaults screen.
Set up the origin's, carrier's and consignee's e-mail addresses on their respective maintenance screens.
Establish an Internet connection.
When you press this button, the program will pop up a checklist screen containing all of the e-mail addresses that have been defined for origin, carrier and/or consignee. Place a check mark on those addresses for which you wish to send the BOL, and then click the e-mail send button at the top of the screen.
The bill is sent as an Adobe Acrobat PDF e-mail attachment. The e-mail subject will be "Bill of Lading" and the message body will state that a bill of lading is attached. There will also be a link to Adobe's website in case the recipient needs to get Acrobat Reader installed on their PC.
Printing Labels
Press the  button to create pallet labels. Please refer to help topic Printing Labels for more information.
BOL Layout
This defaults to what has been set up in Defaults Maintenance. See that help topic for more information.
Renumbering a Bill
If you want this bill to have a different number that does not already exist, then select File - Renumber Bill from the pulldown menu. You will be prompted to enter the new bill number and then to confirm the renumber request. When renumbered, the new bill will be opened.