Contents
- Index
Inventory
If you do not currently have the inventory module, it may be purchased from ALMSys, Inc.
Overview
Lading Manager performs basic inventory functions. It is not intended to replace a full-blown inventory system. The features provided include:
Receiving inventory and storing the location, quantity, and supplier.
Tracking remaining inventory.
Assigning inventory to a bill.
Tracking which bills used inventory.
Pick List report for retrieving items from their locations for a bill.
Various inventory reports.
Purging old inventory records.
How To Set Up Inventory
Inventory is based solely on the items defined in Predefined Carrier Information. Each item to be received MUST have a Predefined Carrier Information record. The first step in the inventory process is to define a master record for each different item type. Access to the Predefined Carrier Information maintenance may be accomplished through the  button at the top of the inventory display.
Here is the initial inventory screen:
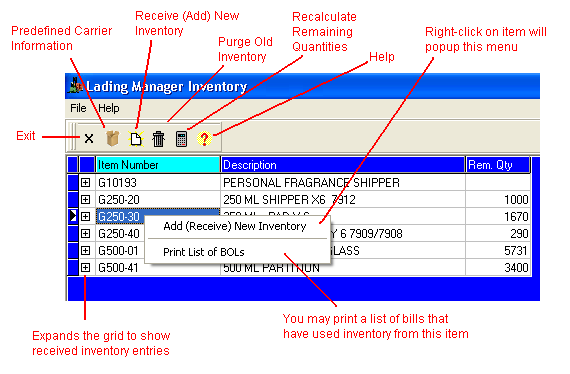
This shows you a basic list of all of the predefined carrier information items that have been defined, plus their overall remaining inventory quantity.
Once an item has been defined, inventory may be received against it. Begin this process by clicking on the item in the grid and then clicking the  button. (Alternatively, right-click on the item and select "Add New Inventory" from the pop-up menu.)
The inventory receive screen looks like this:
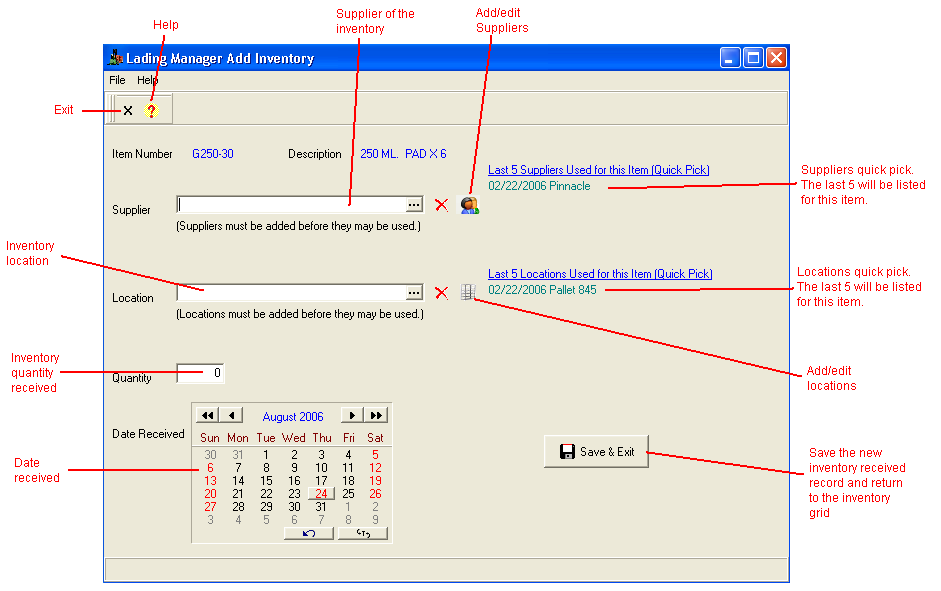
Suppliers and locations must be established before they may be used on an inventory record. Supplier and location are required fields. If you do not know this information, it is recommended to set up a supplier (or location) record that simply states "unknown," and then select it. Upon pressing Save & Exit, the main inventory grid will be updated with the new remaining quantity for the item.
Once inventory has been received, the overall inventory grid may be "drilled down" (expanded) to see individual inventory records. To drill down, simply click the + in front of the item. The resulting grid will look like this:
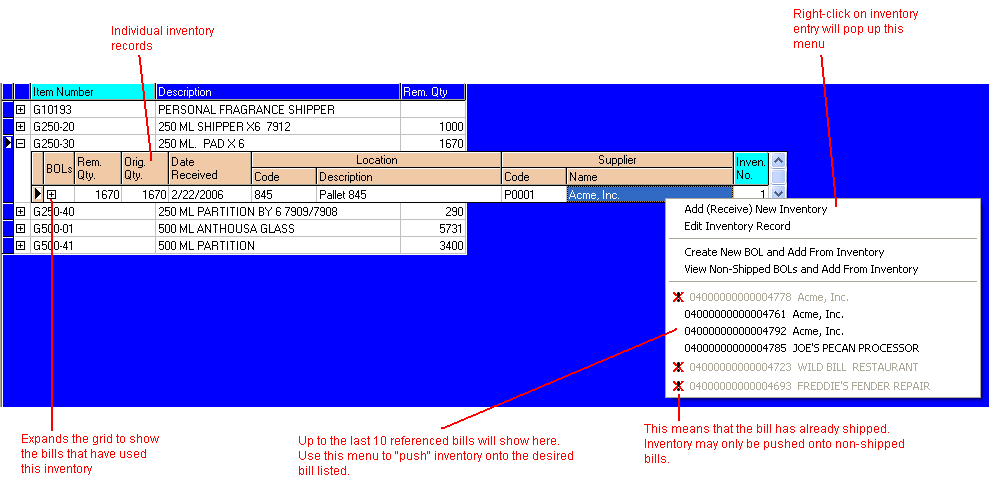
Inventory received data may be edited after it has been received. Editing will allow you to change the inventory's location and supplier information. You may not change the quantity received.
(Note: If you find that after taking a physical inventory the quantity is short, you may post a negative inventory quantity in order to correct the overall remaining quantity.)
Pushing onto a Bill
Once inventory has been established, it may be pulled onto a bill from bill's Carrier Info. page, or it may be pushed onto a bill from the inventory grid, expanded to show the individual inventory records.
When pushing to a bill, you may
Push onto a brand new bill (creates a new bill)
Retrieve a list of non-shipped bills from which to select
Push onto one of the recent bills accessed
All of these choices are presented in the pop-up menu, as shown in the above screen print. When pushing onto a brand new bill, the new bill will be created with the shipper, consignee, and carrier that you specify on the Inventory page of Predefined Carrier Information maintenance.
Pushing onto a bill will take you through a two-step process. The first screen will look like this:

Enter the inventory quantity (and the handling unit quantity, if known) and press Next. The next screen will look like this:
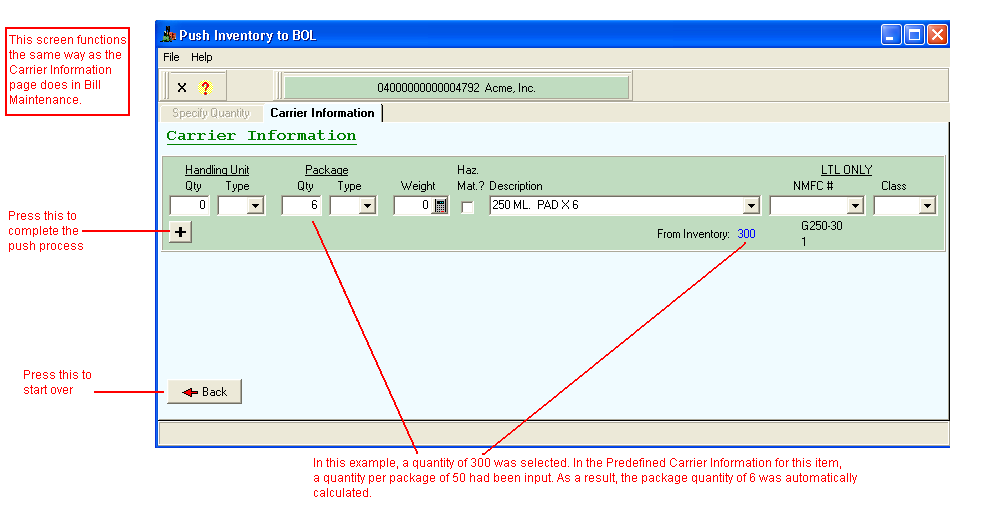
Press the + button to complete the push.
Once inventory has been used on bills, the inventory grid may be expanded to show the list of bills on which the inventory has been used.
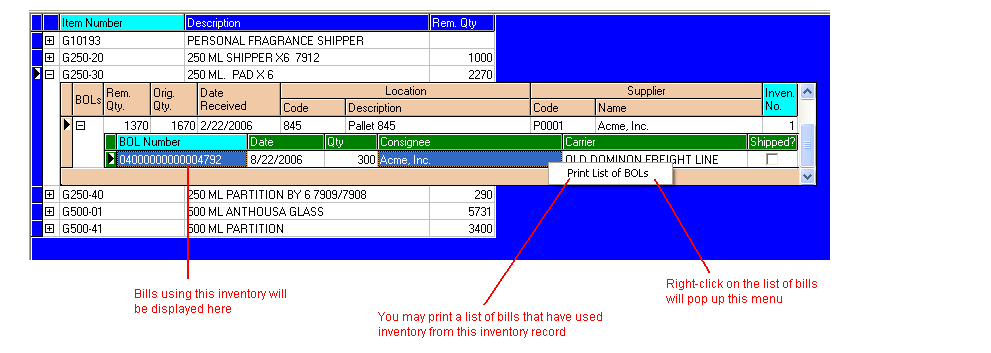
It is important to note that the list of bills using a specific inventory record may be printed via the right-click pop-up menu. This may come in handy in the event of a product recall or other issue with this specific inventory.
Purging Inventory
Inventory items with no remaining inventory may be periodically deleted (purged) from the system. The purge procedure is initiated from the  button on the main inventory screen.
The Purge screen looks like this:
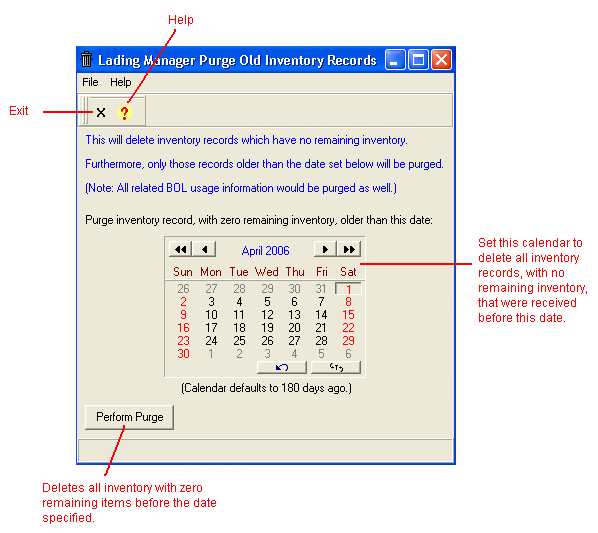
The calendar controls which records to delete, based on the inventory received date. Only those records older than this date (with no inventory) will be deleted. It is important to note that all associated records that show which bill used the inventory will be deleted as well.
Press the Perform Purge button to carry out the purge. It will tell you how may inventory records will be deleted and give you one more chance to abort the process.
Recalulating Remaining Quantities
The  button will recalculate overall remaining quantities, based on inventory received records. Do this only if you think the item-level remaining quantities are incorrect.